There’s no need to have an excuse to show your family how much you love them.
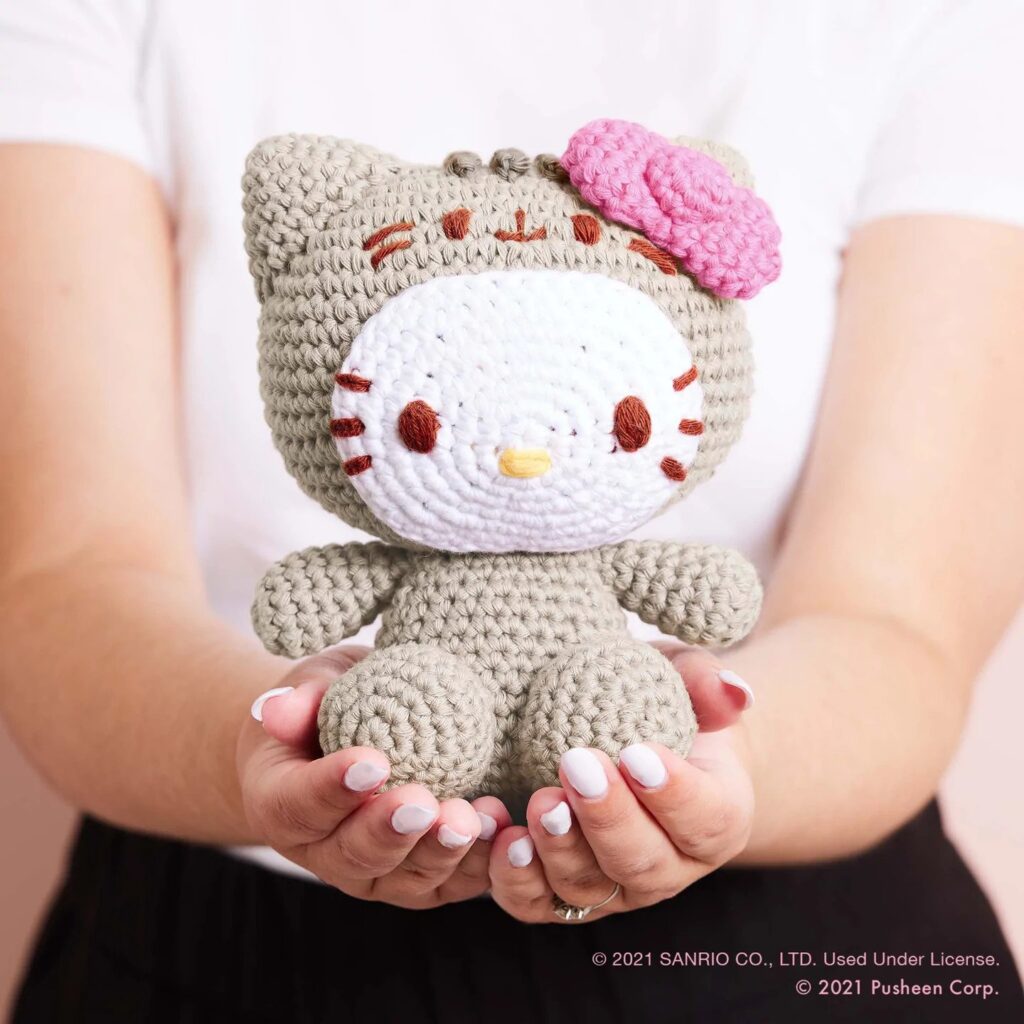
Wouldn’t you like to give your child or granddaughter a special present this time? Something only you can make? Well… I believe this Hello Kitty crochet pattern is right for the job!
The best gifts are the small details you give from the bottom of your heart… And this Hello Kitty crocheted stuffed toy (commonly known as Amigurumi in Japan) is a perfect match!
Whether you’re a professional or are just starting in the knitting world, you can do it!
That’s why here’s a step-by-step tutorial so that you can make this Hello Kitty crochet pattern come to life!
Materials
For this Hello Kitty crochet pattern you will need:
- 2 mm Yarn (white, blue, and pink)
- 2 mm/ 2.5 mm Crochet Hook
- Yarn needles
- Black embroidery thread
- Fiberfill
- 2 Safety eyes size 5/ 6 mm
- 2 Buttons (optional)
Basic Stitches
This is the list of all the stitches you’ll use and their abbreviations. You don’t know any of them? Don’t worry! Click on the links and watch the tutorials I have for you:
- Magic ring – MR
- Single crochet – SC
- Increase – INC
- Invisible decrease – DEC
- Back loop only – BLO
- Slip stitch – SLST
Step-By-Step Hello Kitty Crochet Pattern
Ready, set, go! Time to grab your crochet hook and get started. But before you get down to business, here are some things to bear in mind:
- Crochet patterns are divided into SECTIONS depending on the “body part” you’re knitting.
- Each section is also divided into ROUNDS (rnd). You complete each round once you’ve knitted all the stitches.
- At the end of each round you’ll find a number with the final stitches you’re supposed to have. E.g:
“Rnd 5 . 24 sc + 1 inc at the end- [25]”
Any doubts? Check out how to read amigurumi patterns here!
STEP 1: The Legs
This Hello Kitty crochet pattern goes from the bottom to the top.
For this section, start with white yarn:
Round 1 – Make a magic ring with 8 single crochets – [8]
Round 2 – Knit 8 increases (two single crochets in each stitch) – [16)
Round 3 – Every two single crochets, make 1 increase (16 sc + 8 inc) – [24]
Round 4 to 8 (5 complete rounds) – Knit 24 single crochets straight 5 times.
You’ve got the first leg! But don’t cut the yarn yet; you’ll use it later.
Now repeat these steps to make the second leg and join them with 1 slip stitch.
STEP 2: The Body
Are you ready to use some abbreviations? For the body, start with the blue yarn:
- Round 1 – Make 24 sc on the first leg and 24 sc on the second – [48]
- Round 2 to 6 (5 rnds) – Knit 48 sc straight – [48]
- Round 7 – Every 6 sc, make 1 dec ( 36 sc + 6 dec) – [42]
- Round 8 to 10 (3 rnds) – Knit sc straight – [42]
- Round 11 – Every 5 sc, 1 dec ( 30 sc + 6 dec) – [36]
- Round 12 (pink yarn) – 36 sc straight – [36]
- Round 13 (white) – 36 sc straight – [36]
- Round 14 (pink) – Every 4 sc, 1 dec ( 24 sc + 6 dec) – [30]
- Round 15 (white) – 30 sc straight – [30]
- Round 16 (pink) – 30 sc straight – [30]
- Round 17 (white) – Every 3 sc, 1 dec ( 18 sc + 6 dec) – [24]
- Round 18 (pink) – 24 sc straight – [24]
Now cut the yarn but leave a long tail to sew later. Then, staff the amigurumi firmly. The more fiberfill, the better!
STEP 3: The Head
You’re almost there! For the final part of this Hello Kitty crochet pattern, leave the body aside and start with the white yarn:
- Rnd 1- Make an MR with 8 sc – [8]
- Rnd 2 – 8 inc – [16]
- Rnd 3 – BLO (16 sc + 8 inc) – [24]
- Rnd 4 – Every 2 sc, inc (24 sc + 8 inc) – [32]
- Rnd 5 – Every 3 sc, inc (32 sc + 8 inc – [40]
- Rnd 6 – Every 4 sc, inc (40 sc + 8 inc) – [48]
- Rnd 7 – Every 2sc, inc (48 sc + 16 inc) – [64]
- Rnd 8 – Every 7 sc, inc (64 sc + 8 inc) – [72]
- Rnd 9 to 20 (12 rnds) – 72 sc – [72]
Insert the safety eyes between rounds 13 and 14 with a 9 sc distance.
- Rnd 21 – Every 7 sc, dec ( 56 sc + 8 dec) – [64]
- Rnd 22- 64 sc – [64]
- Rnd 23 – Every 6 sc, dec (48 sc + 8 dec) – [56]
- Rnd 24 – Every 5 sc, dec (40 sc + 8 dec) – [48]
- Rnd 25 – Every 4 sc, dec (32 sc + 8 dec) – [40]
- Rnd 26 – Every 3 sc, dec (24 sc + 8 dec) – [32]
- Rnd 27 – Every 2 sc, dec (16 sc + 8 dec) – [24]
- Rnd 28 – 1 sc, dec ( 8 sc + 8 dec) – [16]
- Rnd 29 – 8 dec – [8]
Stuff the head firmly, cut the yarn and sew it to the body at rnd 3 (of the head) – (BLO round)
STEP 4: The Details
This Hello Kitty crochet pattern is about to come to life! It’s time to make the final details:
EARS (White Yarn)
- Rnd 1 – Make an MR with 4 sc – [4]
- Rnd 2 – 4 inc – [8]
- Rnd 3 – Every 3 sc, inc (8 sc + 2 inc) – [10]
- Rnd 4 – Every 4 sc, inc (10 sc + 2 inc) – [12]
- Rnd 5 – Every 5 sc, inc (12 sc + 2 inc) – [14]
- Rnd 6 – Every 6 sc, inc (14 sc + 2 inc) – [16]
Make two of these, add some fiberfill, and sew them to the head
.
ARMS (White Yarn)
- Rnd 1 – Make an MR with 7 sc – [7]
- Rnd 2 – 7 inc – [14]
- Rnd 3 to 9 (7 rnds) 14 sc – [14]
- Rnd 10 to 15 (6 rnds with pink yarn) – 14 sc – [14]
Knit two pieces, add some fiberfill and leave a long tail for sewing.
STRAPS (Blue Yarn)
Make 36 – 40 sc chains and sew them to the body. You can add a button for decoration!
Now sew all the parts together, embroider the nose and the kitty whiskers, and paint Hello Kitty’s cheeks with some blush.
And voilà! Your Hello Kitty amigurumi is ready. Congratulations!
I hope this Hello Kitty crochet pattern and tutorial has helped you! And, I encourage you to grab your hooks, yarns, and needles… and create something new to share with your beloved one!
If you enjoyed this how-guide then why not give it a share with some family and friends! You can check out more knitting guides and how-to’s by following the link here.
